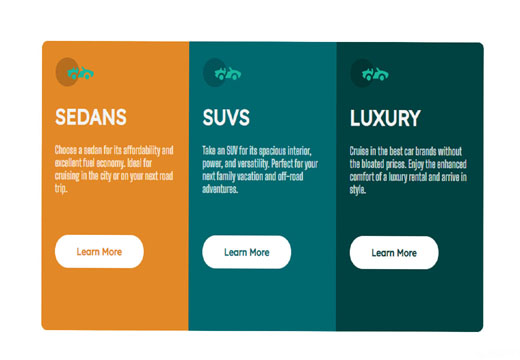
Responsive 3 Column Layout with CSS
Hello friends, today in this blog we will learn how to create a 3-column Responsive layout with Flex Box. In the earlier blog we learn how to create a dropdown menu bar in HTML and CSS.
So Here is the code and my work. I hope you are gonna love this and share whit your friends too. So let's Start learning Responsive 3 Column Layout with CSS | CSS Responsive Layout 3 Column Responsive layout - html css from scratch. So Let's start..
STEP 1: Open any code editor
STEP 2: Create a index.html file with html extension
Create a new file index.html, Here is the code
 <!DOCTYPE html>
 <html>
 <head>
      <meta charset="utf-8">
      <title>Responive 3-column preview card compenent</title>
      <link rel="stylesheet" type="text/css" href="style.css">
      <meta name="viewport" content="width=device-width, initial-scale=1.0">
 </head>
 <body>
      <div class="box-conatiner">
           <div class="box box1">
                <div class="content">
                     <img src="images/icon-luxury.svg" width="70px">
                     <h1>Sedans</h1>
                     <p>Choose a sedan for its affordability and excellent fuel economy. Ideal for cruising in the city or on your next road trip.</p>
                     <button class="btn btn1">Learn More</button>
                </div>
           </div>
           <div class="box box2">
                <div class="content">
                     <img src="images/icon-luxury.svg" width="70px">
                     <h1>SUVs</h1>
                     <p>Take an SUV for its spacious interior, power, and versatility. Perfect for your next family vacation and off-road adventures.</p>
                     <button class="btn btn2">Learn More</button>
                </div>
           </div>
           <div class="box box3">
                <div class="content">
                     <img src="images/icon-luxury.svg" width="70px">
                     <h1>Luxury</h1>
                     <p>Cruise in the best car brands without the bloated prices. Enjoy the enhanced comfort of a luxury rental and arrive in style.</p>
                     <button class="btn btn3">Learn More</button>
                </div>
           </div>
      </div>
 </body>
 </html>
STEP 3: Create a style.css file with CSS extension
 @import url('https://fonts.googleapis.com/css2?family=Big+Shoulders+Display:wght@700&family=Lexend+Deca&display=swap');
 *{
      padding: 0;
      margin: 0;
      box-sizing: border-box;
      /*font-family: 'Big Shoulders Display', cursive;
      font-family: 'Lexend Deca', sans-serif;*/
 }
 body{
      width: 100%;
      min-height: 100vh;
      display: flex;
      justify-content: center;
      align-content: center;
 }
 .box-conatiner{
      width: 100%;
      max-width: 1440px;
      display: flex;
      justify-content: center;
      align-items: center;
      flex-flow: wrap;
 }
 .box{
      width: 269px;
      padding: 15px;
      min-height: 430px;
 }
 .box1{
      background-color: hsl(31,77%,52%);
      border-top-left-radius: 10px;
      border-bottom-left-radius: 10px;
 }
 .box2{
      background-color: hsl(184,100%,22%);
 }
 .box3{
      background-color: hsl(179,100%,13%);
      border-top-right-radius: 10px;
      border-bottom-right-radius: 10px;
 }
 .content{
      padding: 10px;
 }
 h1{
      color: hsl(0,0%,95%);
      text-transform: uppercase;
      font-family: 'Lexend Deca', sans-serif;
      margin: 20px 0;
 }
 p{
      color: hsla(0,0%,100%,0.75);
      font-family: 'Big Shoulders Display', cursive;
 }
 .btn{
      margin: 60px 0;
      padding: 15px 40px;
      border: 0;
      border-radius: 30px;
      outline: none;
      background-color: #FFF;
      font-size: 15px;
      cursor: pointer;
      font-family: 'Lexend Deca', sans-serif;
      font-weight: 700;
 }
 .btn1{
      color: hsl(31, 77%, 52%);
 }
 .btn2{
      color: hsl(184, 100%, 22%);
 }
 .btn3{
      color: hsl(179, 100%, 13%);
 }
 .btn:hover{
      background-color: transparent;
      border: 2px solid #FFF;
      color: #FFF;
      transition: 0.4s;
 }

0 Comments